Total Pageviews

Showing posts with label Ax2012. Show all posts

Friday, March 28, 2025

How to Import D365FO Packages Using Postman and the Data Management Package REST API -- X++ --D365FO Packages import


Introduction:

In this blog, we'll walk through the process of importing a D365FO package using Postman. We will focus on how to use the Data Management Package REST API, providing the necessary steps to configure and send your requests. Additionally, we will explain how to access container files stored in Azure Blob Storage using Postman.

1. D365FO Package Import Using Postman

To import a package in Dynamics 365 for Finance and Operations (D365FO), we utilize the Data Management Package REST API. Here's how you can do it:

API Endpoint

The endpoint to use for importing a package is:

https://BALI.Dynamics.com/data/DataManagementDefinitionGroups/Microsoft.Dynamics.DataEntities.ImportFromPackage

For more details on using the Data Management API, check out the official

2. Authorization

Before you can interact with the API, you'll need to authenticate your requests. The authentication is done via a Bearer Token.

Authorization Header

  • Key: Authorization

  • Value: Bearer <YourToken>

You can obtain the token by registering your app in Azure Active Directory and using the OAuth 2.0 flow to retrieve the token.


3. HTTP Request Headers

You need to set the following headers for your HTTP request:

  • Content-Type: application/json

4. Body of the Request

In the body of your request, you need to provide the necessary details in JSON format. Here is an example:

 {

  "packageUrl": "https://BALIBlob.blob.core.windows.net/saleslines/%74297-B72F-814249C6D103%7D%20",

  "definitionGroupId": "imp salesline",

  "execute": true,

  "overwrite": true,

  "legalEntityId": "BALI"

}


Parameters Explained:

packageUrl: The URL of the package file stored in your Azure Blob Storage. This is the URL where your package file is located.
definitionGroupId: The ID of the Data Management Definition Group you are importing.
execute: A boolean flag indicating whether to execute the import after uploading.
overwrite: A boolean flag indicating whether to overwrite existing data during the import.

    • legalEntityId: The ID of the legal entity associated with the data import 


5. Accessing the Package URL from Azure Blob Storage

The Package URL refers to the location of the package file that is stored in Azure Blob Storage. Here’s how to retrieve it:

  1. Log in to Azure Portal.

  2. Navigate to your Storage Account: Go to the Azure Storage account where your package file is stored.

  3. Select your Blob Storage: Choose the "Blob Service" and navigate to the container where the package is stored.

  4. Access the Container: Click on your container, and you’ll see a list of files.

  5. Select the Package File: Click on the package file you want to import.

its this is D365FO datapackage (exported from d365FO do needfull changes in data package and upload it to container) 


once we have container file URL we can access this from Post man


Conclusion

By following the steps outlined above, you can easily import data packages into Dynamics 365 for Finance and Operations using Postman and the Data Management Package REST API. With the flexibility of Azure Blob Storage for storing your files, this process streamlines data management in D365FO.

For more detailed guidance on using the Data Management API in D365FO, visit the official Microsoft documentation.


Thursday, January 30, 2020

D365FO. Dynamics 365 fiance and operation. Get and update contract of batch job on Controller run method. ax 2012

set Batch id in contract if batch isInBatch check is true

in run method we will update the contract and set the batch id.


class BrFunctionalLocationRecordsController extends SysOperationServiceController
{
    protected void new()
    {
        super(classStr(BrFunctionalLocationRecordsService), methodStr(BrFunctionalLocationRecordsService, functionalLocationRecordsService), SysOperationExecutionMode::Synchronous);
    }

 
    public static BrFunctionalLocationRecordsController construct(SysOperationExecutionMode _executionMode = SysOperationExecutionMode::Synchronous)
    {
        BrFunctionalLocationRecordsController      controller;
        controller = new BrFunctionalLocationRecordsController();
        controller.parmExecutionMode(_executionMode);
        return controller;
    }

 
    public static void main(Args _args)
    {
        BrFunctionalLocationRecordsController controller;
        // to update contract value at main we can initialize contract here.
        //BrFunctionalLocationRecordsContract   brFunctionalLocationRecordsContract;

        controller = BrFunctionalLocationRecordsController::construct();
        //and can set contract values here
        //brFunctionalLocationRecordsContract = controller.getDataContractObject();
        controller.parmArgs(_args);
        controller.startOperation();
    }

 
    public ClassDescription defaultCaption()
    {
        return "@Br:FunctionalLocationRecords";
    }

   
    public void run()
    {
        BrFunctionalLocationRecordsContract brFunctionalLocationRecordsContract;

       //getting batch contract.
        brFunctionalLocationRecordsContract = this.getDataContractObject();
       
        Batch                                   batch;
        if (this.isInBatch())
        {
            //getting batch information;
            batch = this.currentBatch;
            //setting batch id in contract
            brFunctionalLocationRecordsContract.parmBatchHeader(batch.BatchJobId);
        }
        super();
    }

}

Thursday, December 27, 2018

Trigger logic App from D365 Part 2


In this part we will see how to trigger logic app form D365FO (Dynamics 365 For operations)


For logic App details visit Part 1 

Create a class name :LogicAppHelper
with method : callPostWebAPI


class LogicAppHelper
{
    #define.ApplicationJson('application/json')

    public boolean callPostWebAPI(URL _serviceOperation, Comments _postData, str _header ='')
    {
        RetailWebRequest request;
        RetailWebResponse response;
       
        boolean ret;
        ListEnumerator  listEnmr;
        List dataList;
        RetailCommonWebAPI webApi = RetailCommonWebAPI::construct();
   
        try
        {
            response = webApi.makePostRequest(_serviceOperation, _postData, _header #ApplicationJson);

        }
        catch
        {
            ret = false;
        }
   
        return ret;
    }
}


Now we will create runable class (job)

class LogicAppConnectionJob
{        
    /// <summary>
    /// Runs the class with the specified arguments.
    /// </summary>
    /// <param name = "_args">The specified arguments.</param>
    public static void main(Args _args)
    {    
        LogicAppHelper  appHelper = new LogicAppHelper();
        container       conValues;
        AccountNum custAccount;
        str             callingparam ;
        ;
        
        custAccount = 'US-001';

        callingparam  = "{'CustomerAccount':'" + custAccount +" '}";

       //appHelper.callPostWebAPI(URL ,Comments,_header
       // URL : URL generated while creating logic for details see part 1
       // Comments: passing customer account to logic app as JSON Schema for details see part 1

        appHelper.callPostWebAPI('https://URL-Generated-By-Logic-App-Response-Receiver' ,callingparam);
    }

}

hopefully this will help you all...

Monday, December 24, 2018

Logic App For Dynamics 365 for operation (D365FO).Azure logic App (part 1)


Summary :
In this part we are going to create Logic App for Dynamics 365 For Operations.in this we will see how we will send email using logic app.
As we know right now there are no triggers for D365 FO, so we will achieve this using http response receive.
In this part we will discuss


a)      Login azure portal.
b)      Create Resource for logic app.
c)      Create basic logic app 
d)      And trigger logic using post man 

Part 2

  
Step 1:
Sign in azure portal


Step 2:
After log in, go to Create a resource à Web à Logic App


Step 3:
a. Enter logic app name e.g DemoLogicApp.
b. Select Subscription.
c. Check Create new in resource group.
d. Enter resource group name like DemoResourceGroup
e. Select location
f. Click on create.

Step 4:
Click All services
filter by Logic App


Step 5:

Click DemoLogicApp
It will open logic App Designer
Select Blank Logic App


It will look like 


 Step 6:
First we will add trigger to logic app(trigger is the point which define when to execute logic app)
 a)      Search for logic app trigger (When a Http Request is Recevied)

 b) Select When a Http Request is received 


 c) Now add Json Schema: 
Step 7:
a)  Now we will add action. Click next step


    b) Search for send email action
    c) Select Office 365 Outlook

   d)  Select send Email


 e)  Now we will sign in to office 365 Outlook.

  f)    Fill details
a.       Add to account
b.      Subject
c.       Body (you can add customer account which was define in jSon Schema.


Step 8:
Click on save
It will generate Https url
  Step 9:
        a)      Go to post man
        b)      Select post
        c)       Enter url
d      d)  Go to header tab add key and value 
    e) Go to body and define body (we defined json Schema in logic app)         


    f)  Click on send
    g)  Go to logic app àOverview à click refresh
We can see the status is succeeded which mean logic app got triggered and send email successfully 


in next part we will discuss how to connect D365 with logic apps 


Part 2 in this part we will discuss how to trigger Logic App From D365


Thursday, December 7, 2017

Creating Payment journal and posting Payment journal ax2012 /D365 ax7 x++

Public static boolean processPayment(BAModule BAModule)
{
ledgerJournalName  JournalName ;
ledgerJournalCheckPost JournalCheckPost;

ledgerJournalTable JournalTable;
ledgerJournalTrans JournalTrans;
JournalCheckPost JournalCheckPost;

Common common;
NumberSeq numberseq;
CustTrans custTrans;
CustTransOpen custTransOpen;
Specification specOffsetVoucher;

BAParameters parameters = BAParameters::find();
CustTable custTable = CustTable::find(BAModule.CustAccount);
boolean return = false;
InvoiceId invoiceId;
;

while select custTransOpen
where custTransOpen.RefRecIdCheck == BaModule.RecId &&
custTransOpen.UseRefRecId
{
custTrans = custTransOpen.custTrans();
invoiceId = custTrans.Invoice;

try
{
ttsbegin;

select firstonly JournalName
where JournalName .JournalName == parameters.JournalName Id &&
JournalName .JournalType == LedgerJournalType::CustPayment;

if(!JournalName .RecId)
throw error("@11250");

if(JournalName )
{
JournalTable.JournalName = JournalName .JournalName;
JournalTable.Name = JournalName .Name;
JournalTable.insert();

if(JournalTable)
{
numberseq = NumberSeq::NewGetVoucherFromCode(JournalName .VoucherSeries);
JournalTrans.JournalNum = JournalTable.JournalNum;
JournalTrans.Voucher = numberseq.voucher();
JournalTrans.TransDate = today();
JournalTrans.Txt = CustTable::find(JournalTrans.AccountNum).Name;
JournalTrans.OffsetAccountType = JournalName .OffsetAccountType;
JournalTrans.OffsetAccount = JournalName .OffsetAccount;
JournalTrans.Dimension = JournalName .Dimension;
JournalTrans.CurrencyCode = JournalTable.CurrencyCode;
JournalTrans.AccountType = LedgerJournalACType::Cust;

JournalTrans.TransactionType = LedgerTransType::Payment;
JournalTrans.PaymMode = parameters.PaymMode;
JournalTrans.SettleVoucher = SettlementType::SelectedTransact;
JournalTrans.AccountNum = custTable.AccountNum;
JournalTrans.AmountCurCredit = custTransOpen.AmountCur;
JournalTrans.ExchRate = ExchRates::find(JournalTable.CurrencyCode, datenull(), NoYes::No, NoYes::No).ExchRate;
JournalTrans.insert();

select custTransOpen
where custTransOpen.AccountNum == custTable.AccountNum &&
custTransOpen.RefRecId == CustTrans::findFromInvoice(invoiceId).RecId;

if(custTransOpen)
{
common = JournalTrans;
specOffsetVoucher = Specification_OffsetVoucher::newCommon(common, true);
if (!specOffsetVoucher.isMarked(custTransOpen.TableId, custTransOpen.RecId))
if (JournalTrans.RecId)
specOffsetVoucher.create(custTransOpen.TableId, custTransOpen.RecId, custTransOpen.AmountCur, JournalTable.CurrencyCode);
}

JournalCheckPost = JournalCheckPost::newJournalTable(JournalTable, NoYes::Yes);
JournalCheckPost.run();
return = true;
}
}
ttscommit;
}
catch
{
ttsabort;
return = false;
}
}
return return;
}

Friday, November 24, 2017

Creating a Valid Time State Table/Maintaining ValidTimeState Record


Maintaining Version of table record
Step 1)
Create Table Name: TableA and add fields to tha table

Note : You can change the ValidTimeStateFieldType to any value when the table contains no data. You can change the value to None even if the table contains data.

Step 2) go to table properties and set following properties          

Now Valid to valid from fields are added to your table automatically

Step 3 ) Create index and go to properties and set following properties

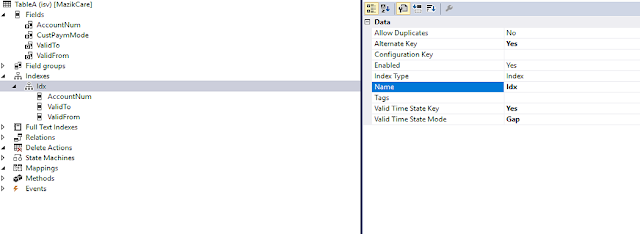
At least 3 fields will be added to index valid to, valid form and one other field (like accountNum as shown in table)

Note : You can change the ValidTimeStateMode property from Gap to NoGap only if the table contains no data. You can change from NoGapto Gap even if the table contains data.


D365FO and Sharepoint integration issue on dev box: "You are not authorized to connect to 'https://sharepoint.sharepoint.com/

Troubleshooting SharePoint Integration After Upgrading D365FO to Version .42 After upgrading to Dynamics 365 Finance and Operations (D365FO)...